Hello, I blog!
I share all my sporadic and toilet thoughts in here, because I am random like that.
Two languages, but one understanding
I met an autistic boy today.
He was one of the helpers at the craft store I went to this afternoon. A cozy family business, that craft store was. I was really glad that the family business somehow allowed him to be part of the crew so that he gets to mingle with and meet new people.
The expression on his face when I approached him for help in the store was … hard to describe.
A mixture of joy and confusion perhaps. Joy towards how I approached him and spoke to him like a normal person, but confusion because he had no idea how to help me. His face was initially all aglow, before it was shrouded in bewilderment and he finally, gestured towards another lady to assist me.
Later on, he had taken to following me around the store.
I was looking for ribbons, and he lingered around in the nearby vicinity as I pored through the shelves and shelves of ribbon reels. It was clear that he could communicate, just that he didn’t know how. Occasionally, I’d pick up a roll of ribbon and go “hmm,” “too narrow”, “too wide” or “too expensive”, and I can hear all sorts of murmuring and squeaking noises coming from his general direction.
It was like we were having a conversation, only with both parties speaking in different languages … but still understood each other.
There was one point where I jokingly lamented about how the ribbons here were sold in reels and not per metre and he giggled along with me.
Later on, I reached for a tri-coloured (red, blue and white) ribbon reel and the murmurs and squeaks from the boy became louder. I looked up at him, and he pointed to the ribbon reel and gestured to his neck in a roundabout motion in response.
“Ah, this one is for medals!” says I.
And the boy began nodding wildly, squeaking and murmuring his approval.
The boy shadowed me around the store until I was ready to checkout. At that time, I stood patiently by the counter, waiting for one of the ladies in charge to finish whatever she was doing so that she could ring up my purchases.
The boy didn’t let me wait, though. He gestured/squeaked/murmured loudly for the attention of another storekeeper to come assist me and I was all ready to go in a matter of a couple of minutes.
I could have sworn that he said “bye” when I left the shop.
I has (new) awezm necklaces
Basically stuck at home all afternoon nursing a high fever, a horrendously bad sore throat and multiple joint aches, I was bored to tears.
Unable to sit still (and do nothing) for long, I dug out my box of black and white Perler beads and began to fiddle around with them.
About an hour later, this was the outcome – I now have four new awesome necklaces, yo.
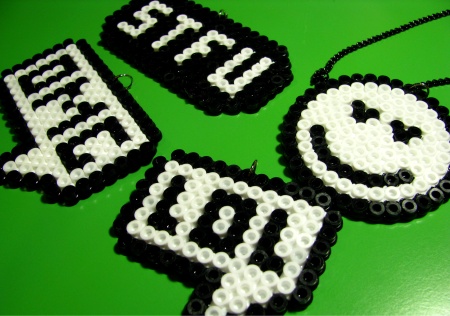
Speech bubbles, FTW!
And the following message would be awesome for those jackasses who love to talk (yell) into their phones at maximum volume on public transport.

STFU, OMG!
I want to get some grey Perler beads so that I can start experimenting with shadows. Oh, and I want to make that adorable Mario mushroom I saw here!
Tee-painting in progress
I’ve been wanting to do this since forever but have been holding out for years. One, because I had little or no faith in my painting abilities – especially when it comes to fabrics. Two, I didn’t have any good-quality plain tees on hand and was too lazy to head out to source for one.
So, when a plain white tee (of very decent cotton quality) landed on my lap (thanks to the sample t-shirt sourcing done by my work company a coupla’ months ago), it was a painting opportunity screaming for my attention.
Additionally, when I spotted a giant ‘Sales!’ banner at Spotlight – Singapore’s largest fabric and craft store – the opportunity began screaming even louder. I managed to get DYLON black fabric paint at 20% off. Whee.
I began by manually drawing out letters using a blunt pencil. (Yes, manually. No stencils were involved here because I had none. I measured the dimensions of the tee like crazy to ascertain where exactly I wanted the letters and that they were positioned symmetrically. I’m that anal. :P)
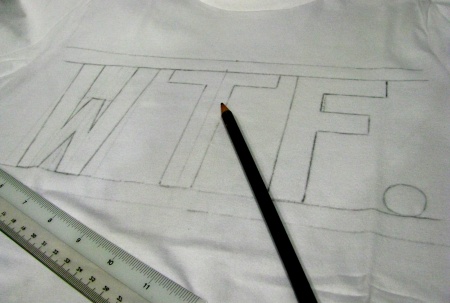
Drawing out the letters.
If you intend to do a similar tee but is too lazy to draw out the letters manually, you can create your own stencils by printing out letters on light cardboard and cutting them out.
And yeah, I know your eyes are boggling right now at the choice of letters on the t-shirt. I’ve been wanting a t-shirt with “WTF” printed on it since forever and I can’t seem to find them anywhere. So I decided to make my own.
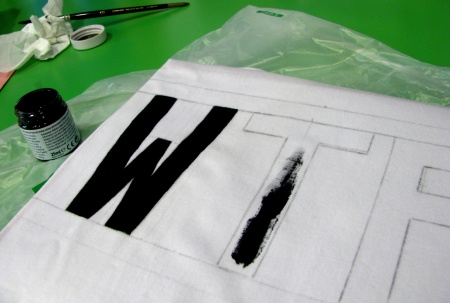
Painting in the letters with fabric paint.
Following which, I filled in the letters with a soft brush dipped in the fabric paint. Because I wasn’t using stencils, this was pretty tricky especially when it came to ensuring the edges of the letters were perfectly straight. (Well, they weren’t in the end. But the very slight jaggedness was not very noticeable unless you looked very closely.)
Thankfully, I had decently steady hands so the outcome turned out pretty well.
Leaving the tee out to dry.
I left the tee out to dry for approximately three hours. Actually, the required drying time was much less than that but I just wanted to be sure. (First time painting a t-shirt, remember? Plus, I was really worried I might screw up something – although everything was pretty smooth thus far.)
After drying, iron over the letters (to set the paint permanently) with an electric iron on the highest possible heat setting, and a cloth placed over the letters (no direct heat contact here – the last thing you’d want is a t-shirt on fire!). The instructions on the bottle of fabric paint called for 1-2 minutes, but I did this for 4-5 minutes. (Weeeell. Just wanted to be sure again.)
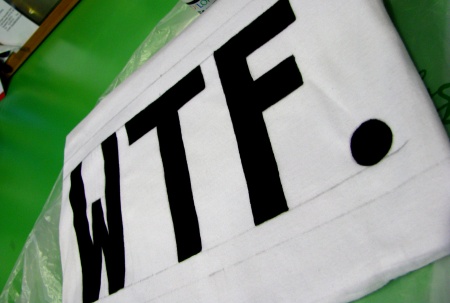
Thus, behold!
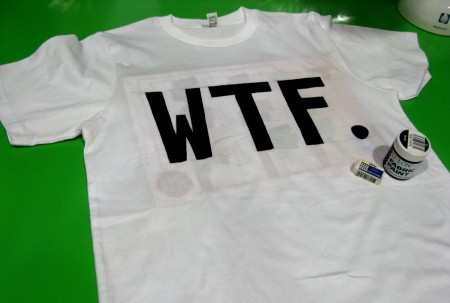
The end product!
Oops, pardon that magazine placed beneath the words. I wanted to separate the painted side from the back of the tee for a while more … just to be sure. (Yes, again. Hahaha.)
Now that the tee painting is complete, it’s time for the last crucial step – putting the tee through its first wash.
I really hope the fabric paint behaves the way it is expected to and stays on the t-shirt.
I do not want to end up with a blackish stained, pseudo tie-dyed shirt to account for the amount of (extremely anal) work I’d put in!