Hello, I blog!
I share all my sporadic and toilet thoughts in here, because I am random like that.
Cycling is awesome
I cycled a total of about 14 kilometres today – from Still Road South to the eastern end of East Coast Park (near NSRCC) and back (map). This excludes some additional scenic exploration detours along the way.

Long evening shadows.
I’m pretty pleased, because I haven’t properly cycled in aeons. Additionally, didn’t quite realize that I could last all the way – usually my heart goes bonkers after a while – but it held out! (;
Invigorating, it was. The sky was a clear blue, and I witnessed a pretty awesome sunset.
Should definitely do this more often.
How IV sedation benefited me
After having gone through one round of root canal treatment a coupla’ weeks ago – with another coming along three days from now – with IV sedation, I feel it’s beneficial to share how it went, and to let you guys know that there is such an option available.
Not many folks are aware that they can opt for IV sedation on top of local anaesthasia for minor surgical procedures, or for dental procedures. At least, not in Singapore. Based on some of the overseas forums I’ve read, IV sedation is more commonly practiced in the U.S. or U.K. Whereas, it is comparatively rarer here.
IV sedation involves the administration of a mixture anti-anxiety drugs and a sedative directly into the bloodstream via an IV line usually inserted at the back of the hand. The drugs put the patient into a state of light sleep, thus rendering him/her unaware of the procedure being carried out, but will not bring about a complete loss of unconsciousness. (Note: Not to be confused with General Anaesthasia.)
IV sedation helps a lot when dealing with procedural anxiety. I get generally apprehensive when it comes to medical procedures. That’s common, so does everyone else. However, nothing scares the shit out of me more than getting a dental procedure done.
I didn’t opt for IV sedation to cope with the fear though. I felt it was a better option for me because of my background heart condition. Heart condition plus procedural anxiety do not get along. The last thing I wanted was to end up in atrial tachycardia or explode into one of my epic heart flutter attacks in the midst of getting such a procedure done – which is why I chose to be sedated.
I spent about a week researching intensively on IV sedation and its pros and cons, and eventually decided that it was the best choice for me. My decision was met with a fair amount of resistance though, which held me back a little – but I stood firm with my decision and went ahead with it eventually.
I wasn’t at all surprised by the resistance expressed though. IV sedation is not as commonly practiced here, hence the reduced exposure to such cases (leading to the “huh?! Is it even necessary?!” mentality), and the general lack of awareness about it. One of my doctors even mixed up IV sedation with General Anaesthasia (the latter of which is much, much riskier).
General Anaesthasia induces deep unconsciousness and requires intensive monitoring of the patient’s vital signs. GA also takes much longer to recover from, with a higher risk of complications as it greatly suppresses the cardiovascular and respiratory systems. Patients under GA are always intensively monitored with the whole horde of menacing beeping machines you see in the Critical Care Units.
That is not to say that IV sedation is completely risk-free, though. There are very, very rare incidences of patients requiring artificial resuscitation as they were too deeply sedated. But every medical procedure has its fair share of risks. Even the root-canal procedure I went through had a risk level of complications far higher than the actual sedation itself (because mine unfortunately, also involved a deep infection of the bone).
IV sedation on the other hand, acts on the central nervous system which in turn, suppresses the cardiovascular and respiratory systems, but only slightly. The patient is unaware of what is going on due to the amnesia-inducing properties of the drug, but will not be completely unconscious which makes it much easier for the anaesthetist to manage.
I recovered really quickly post-sedation – “coming to” within 15 minutes after drug administration was stopped, and could even walk (albeit a little wobbly) almost immediately. I was monitored throughout the time I was “out” – but only with an pulse oxymeter and a blood pressure cuff … because that is only about what was needed.
It really helped me in the sense that it slowed down my usually rapid heart rate. And because I was “out”, there wasn’t any anxiety experienced that could potentially bring on a full fledged attack. The only minus about it was the involvement of an IV butterfly needle (which didn’t bode well with my general fear of needles). But better that, than to remain in a state of extreme stress for two hours with a potential atrial tachycardia attack lying in the background.
There are some inconveniences that accompany IV sedation though, such as the need to remain rested for the remaining day, and slight nausea. However, if you have background medical conditions that can potentially complicate a procedure, or severe procedural anxiety, IV sedation benefits more than anything else.
Of course, there are the sceptics that claim that “IV sedation is for pussies”, “You aren’t man enough if you need IV sedation”, or “IV sedation is only an easy way from anxiety.”
Forget all that, because all those are simply noise interfering with the patient’s personal decision based on his/her own background.
Ultimately, I believe it is about what’s best for you, and your comfort level.
If you’re curious and want to read up more, here are some links to help you.
Dental Fear Central: IV (Intravenous) Sedation
IV Sedation versus General Anaesthesia
Wikipedia: Twilight Anaesthesia
IV Sedation – Is it safe?
Dental Relaxation: IV Sedation
And yeah, the whole purpose of this post is to let you guys know that when it comes to stuff like these, you have options to choose from. Don’t let fear stop you from undergoing any procedure you have to go for because recovery (or the prevention of further complications and infection) matters more than anything else.
And also to the folks with underlying medical conditions (like me) that could cause complications in conjunction with anxiety – look, choices!
Meanwhile, wish me the best of luck for this coming Thursday – it’s Round 2 of my Root Canal procedure (yes folks, with IV sedation) and I am going to have to contend with a swollen left cheek, various aches and pains, and potential light fever for two days after that. Whoopie.
Tee-painting in progress
I’ve been wanting to do this since forever but have been holding out for years. One, because I had little or no faith in my painting abilities – especially when it comes to fabrics. Two, I didn’t have any good-quality plain tees on hand and was too lazy to head out to source for one.
So, when a plain white tee (of very decent cotton quality) landed on my lap (thanks to the sample t-shirt sourcing done by my work company a coupla’ months ago), it was a painting opportunity screaming for my attention.
Additionally, when I spotted a giant ‘Sales!’ banner at Spotlight – Singapore’s largest fabric and craft store – the opportunity began screaming even louder. I managed to get DYLON black fabric paint at 20% off. Whee.
I began by manually drawing out letters using a blunt pencil. (Yes, manually. No stencils were involved here because I had none. I measured the dimensions of the tee like crazy to ascertain where exactly I wanted the letters and that they were positioned symmetrically. I’m that anal. :P)
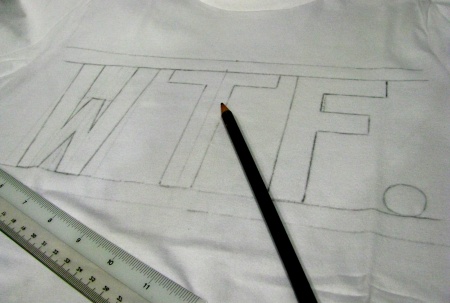
Drawing out the letters.
If you intend to do a similar tee but is too lazy to draw out the letters manually, you can create your own stencils by printing out letters on light cardboard and cutting them out.
And yeah, I know your eyes are boggling right now at the choice of letters on the t-shirt. I’ve been wanting a t-shirt with “WTF” printed on it since forever and I can’t seem to find them anywhere. So I decided to make my own.
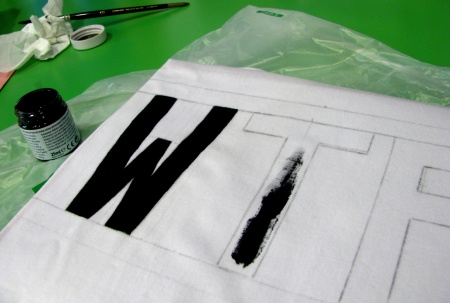
Painting in the letters with fabric paint.
Following which, I filled in the letters with a soft brush dipped in the fabric paint. Because I wasn’t using stencils, this was pretty tricky especially when it came to ensuring the edges of the letters were perfectly straight. (Well, they weren’t in the end. But the very slight jaggedness was not very noticeable unless you looked very closely.)
Thankfully, I had decently steady hands so the outcome turned out pretty well.
Leaving the tee out to dry.
I left the tee out to dry for approximately three hours. Actually, the required drying time was much less than that but I just wanted to be sure. (First time painting a t-shirt, remember? Plus, I was really worried I might screw up something – although everything was pretty smooth thus far.)
After drying, iron over the letters (to set the paint permanently) with an electric iron on the highest possible heat setting, and a cloth placed over the letters (no direct heat contact here – the last thing you’d want is a t-shirt on fire!). The instructions on the bottle of fabric paint called for 1-2 minutes, but I did this for 4-5 minutes. (Weeeell. Just wanted to be sure again.)
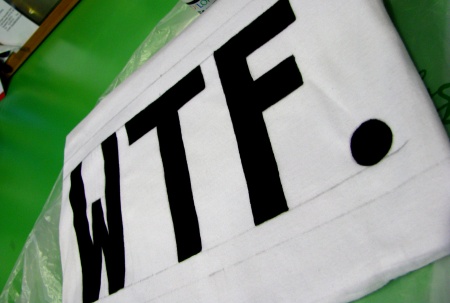
Thus, behold!
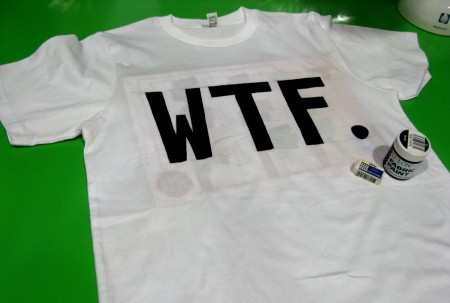
The end product!
Oops, pardon that magazine placed beneath the words. I wanted to separate the painted side from the back of the tee for a while more … just to be sure. (Yes, again. Hahaha.)
Now that the tee painting is complete, it’s time for the last crucial step – putting the tee through its first wash.
I really hope the fabric paint behaves the way it is expected to and stays on the t-shirt.
I do not want to end up with a blackish stained, pseudo tie-dyed shirt to account for the amount of (extremely anal) work I’d put in!